PDF templates
How PDF templates work
The purpose of this feature is to allow using existing PDF forms and using Form Runner to fill them out. This has the benefit that your organization can reuse existing forms, which might have been designed carefully for printing or archival purposes.
A PDF template must include Acrobat form fields. You can create these with Acrobat Professional. At runtime, when producing a filled-out PDF, Form Runner performs the following operations:
- read the PDF template
- read the filled-out form data
- fill out the fields in the PDF template based on the data
Creating a PDF template for use with Form Builder
Steps
In order to create a template, you need Acrobat Professional or a similar tool to edit PDF fields. Here we assume Acrobat Professional.
- Open an existing PDF document
- Perform automatic field detection
- Remove incorrectly detected areas
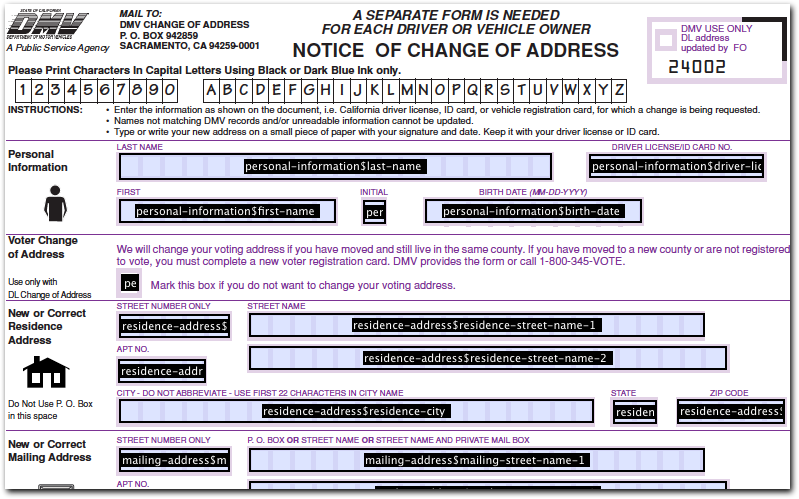
- Set all field names, as per the
section-name$field-nameexplained below
NOTE: For languages like French, make sure that fields in the form have an Arial font, not Helvetica. Not using Arial can cause issue with accents.

Naming fields
Form Runner identifies the PDF fields to fill-out based on their name. Those names must follow the following convention:
- Let's assume you the name of a field to
my-fieldand the name of the section in which that field is tomy-section. - The name of the PDF field must be:
my-section$my-field.
[LIMITATION] It has been reported that Adobe Livecycle Designer does not support the $ character in field names.
Controls
Multi-line text
- Enable multi-line in Acrobat form field
- Set a white background if necessary to hide dotted lines from the original form
Exclusive checkboxes or radio buttons
In the PDF, create multiple fields of type radio button (which can visually appear like checkboxes or radio buttons - the defining feature is that they are exclusive), all with the same name: my-section$my-field, but each with an Export value matching the corresponding value in your form. In summary:
- Use PDF radio buttons with the desired appearance.
- Use the same name for all controls.
- Use different export values for each control.
- The checkbox value (and not the label) is used by Form Runner to match on the export value.
Non-exclusive checkboxes
- Create multiple PDF checkboxes.
- Each checkbox must have a different name of the form
my-section$my-field$value, wherevaluecorresponds to the item value in your form. - Set an export value for all the checkboxes of
true.
Boolean checkboxes
For a boolean checkbox:
- Create a single non-exclusive PDF checkbox.
- Name it
my-section$my-fieldormy-section$my-field$true. - Set an export value of
true.
Image attachments
To place an image attachment on your PDF, simply add a placeholder Acrobat form field.
- This field will be used by the PDF engine to determine the image location and dimensions.
- Name the field using the
section-name$field-nameformat, wherefield-nameis the name of the image attachment field in Form Builder.
When the resulting PDF is generated by Form Runner, the field will not contain text, but the image attachment will be placed within the space defined by the field.
Repeats
When a control is within a repeat:
- the identifier of the repeat must be included in the acrobat field name
- the repeat iteration must be appended to the acrobat field name
So for example, if you have the hierarchy:
my-sectionmy-repeatmy-input
The field names must look like:
my-section$my-repeat$my-input$1for the first iterationmy-section$my-repeat$my-input$2for the second iteration- etc.
